
Wednesday, 28 March 2012


Monday, 12 March 2012
Mist and Fog effect method
Step 1
I will upload an image that I would like to add mist and fog effect.

Step 2
I will first add a new layer so I can add the mist effect first.

Step 3
I will use a big white soft brush and paint along the bottom of the image.

Step 4
The mist now looks heavy, to soften the mist down, I will go to layers and lower the opacity to around 50% to give a nice transparent look.

Step 5
I’m done with the mist so now I will add the fog which is a bit thicker. I will get a second picture of clouds and upload the image onto Photoshop.

Step 6
I want the clouds to be black and white. Image>desaturate


Step 7
I need the sky that used to be blue to be really dark. Image>adjustments>levels.

Step 8
Now I have black and white clouds. I can drag the image to the lake then I will change the blend mode of the clouds into ‘screen’ which will make anything black transparent.


Step 9
The fog is hanging up in the air,I want it to be hanging over the lake, so we want to squash the clouds. Hold Ctrl-t to free transform the clouds.

Step 10
At the moment it does not look right as the fog is too sharp, whereas in reality fog is much softer and fluffy. Filter>blur>Gaussian blur. I willincrease the blur to make the fog look fluffy and softens the hard edges.


Step 11
At the moment I still have hard edges, so I will use the rubber tool to rub out the edges by using a soft rubber.

Step 12
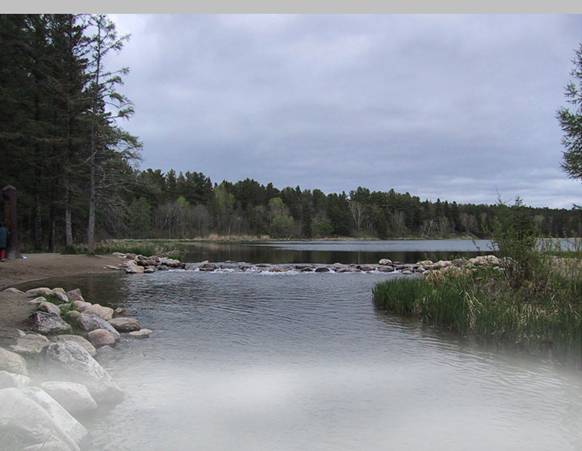
Step 13 (Optional)

Step 14
I can flip the duplicated fog upside-down. Image>transform>flip horizontal, this will avoid repeating pattern.

Step 15
I can give that duplicated fog a little twist by turning it sideward’s. I will also tweak the opacity of the two fogs to get the effect to look exactly I want it to be.

Step 16
Again, I will use the rubber tool to get rid of any hard edges.
Final results

Thursday, 1 March 2012
Airbrushing method
Step 1
First, I will go to the File menu and select Open to open a photo I would like to edit.

Step 2
In the next steps, I will be duplicating the layer twice and applying two filters to each of the new layers. Before I continue to duplicate the layer, I'm going to use the Lasso tool to draw a selection of the skin and duplicate only that area. This will reduce the amount of pixels to work with and reduce the load on the computer.

Step 3
I will press Ctrl+J to duplicate the layer. I will do this once more so that I have two layers. Now, I will rename the top layer to "High Pass" and the middle layer to "Low Pass".

Step 4
I will work on the Low Pass layer first. In the Layers palette, I will click on the eye beside the High Pass layer to hide the layer and I willselect the Low Pass layer that I will be working on.

Step 5
I will be using the Surface Blur filter. Filter> Blur> Surface Blur. The surface blur filter blurs the image but preserves the edges. The Surface Blur provides two options:
- Radius:
This setting specifies the size or strength of the blur. Use a higher setting for larger images.
The Radius option specifies the size of the area sampled for the blur. - Threshold:
This setting allows me to define the area to blur.
First, I will set the radius and threshold so that the image becomes blurry but still recognizable. Then, I will lower the Threshold and stop just when the edges become sharp. Now I will adjust the Radius so that the skin is smooth.

Step 6
I’m done with the Low Pass layer. Now I will work on the High Pass layer.That'll restore the tiny details such as the bumps and pores. I will select the layer, I will click on the eye beside the High Pass layer, and change the layer blending mode to Linear Light.
The tiny bumps of the skin is most visible on the neutral tones of the skin and least visible on the dark tones of the skin. To simulate this natural effect, I will add a layer mask that will reduce the visibility of the bumps on the darker tones of the image. I will add a layer mask by clicking the (see below) button


Step 7
I will use the Apply Image tool to apply a copy of the image in the layer mask. Now I have a layer mask that defines and reduces the effect in those dark areas.

Step 8
I'm done with the layer mask, I will click on the thumbnail of the layer (not the layer mask).

Step 9
I will be using the High Pass filter next. The next step will require a lot of precise adjustments, so before I proceed, I will zoom in 100% on somewhere near the skin.

Step 10
Expand the Filter> Other menu and I will select the High Pass filter. In the High Pass filter, I will adjust the Radius in small increments until the skin looks natural.
High Pass retains edge details in the specified radius where sharp colour transitions occur and suppresses the rest of the image. (A radius of 0.1 pixel keeps only edge pixels.) The filter removes low-frequency detail in an image.

Step 11
Now I'll go back and tweak the settings of the layer mask. In the layers palette, I will click on the thumbnail of the layer mask to activate it. Then, I will go to the Image> Adjustments menu and select Brightness/Contrast. In the Brightness/Contrast tool, I will increase the contrast and adjust the brightness so that the bumps on the skin is less visible on the dark areas and more visible on the bright areas.


Step 12
I'm done smoothing the skin, but now the whole image is smooth. I need to use a layer mask to erase the effect from the areas that are not the skin. I will select the top two layers and press Ctrl+G. Then, I will add a layer mask by going into the Layers> Layer Mask menu and selecting Hide All.

Step 13
I should now see back the image the way it originally was without the smooth skin effect. I will be painting the layer mask over the skin. But because this effect is subtle, it may be difficult to see where we have painted over. So before I paint the layer mask, I will add a new layer above the High Pass layer and fill it with the colour red. Then, I will change the opacity of the red layer to 50%.

Step 14
I will select back the Group layer mask by clicking on the black thumbnail in the layers palette. I will select the brush tool and paint over the skin to make the smooth skin effect visible over those areas that I paint. I will start with large diameter and a hardness about 50. Then, I will fill in the tiny spots with a smaller brush.

Step 15
I will delete the red fill layer when I'm done.
Final Results

Monday, 27 February 2012
Lyrics, Somehow Someway
Somehow someway, somehow someway
One day, yeah
I told her you can make it baby somehow someway
With that body you should be on the runway
But if you don’t make it then its ok
We can get high and just dance like soul play
You're always playing songs like you know trey
And in the bed you cut it like OJ
Then you just chill with a sig and some OJ
Man it’s so great
She yellow like that song by cold play
See but still gangster like Z dot and Nolay
When I’m with her nuff head rotate
But no one can approach coz they know that I’m known for it
She saying that I’m so bait, nuff chicks on the FB
Half of them really wana f me she ain the only one that wants a piece of the ST
Now we gonna make it baby somehow someway
even if you ain my lady somehow someway
One day,
Coz right now I’m thinking bout you Monday to Sunday
Coz right now I’m thinking bout you Monday to Sunday
Yeah we’ve been tight from them school days
She always use to act in them school plays
Like some young Halley Berry
One day I’d like to put a bump in her belly… you know, start a family
If we don’t end up together it would be a tragedy
Some real boy meets girl stuff
Some me and her against the world stuff
She the ride or die wifey type
I ain't saying that this things for life
I’m just saying that its feeling right
I’m just saying that you're looking nice
Now let me slip up in between your thighs
We can do it over and over again
Hear you on the phone to your friend
Saying how I’m so great
It will all be okay
And we gonna make it baby somehow someway
Yeah we gonna make it baby somehow someway
Even if you ain my lady somehow someway
One day
Coz right not im thinking bout you monday to sunday
Coz right not im thinking bout you monday to sunday
Analysis on Drake

Drake began writing songs when he was ten years old. Since then he has collaborated with The Clipse Pharrell Justin Timberlake Kanye West and Eminem to name.
In 2006 Drake started and released his first mixtape, it provides insight into mind changing it from the smooth ballads that can be cherished by the softest women's stories about her family. Drake continues to pursue his passion for R&B Money lyrics for many up and coming R&B singer much of his musical influence comes from his family includes the funk creator Larry Graham (Graham Central Station) which hit song "One in a Million" became a top 10 hit, and Mabon "Teenie" Hodges, who along with Willie Mitchell was the soulful mastermind behind most of Al Green hits (9 Grammy Awards). Drake has worked with Cash Money Records TVT BMG and has been on tracks with producers Mike City Neek Rusher Sauk Rates and Brian Cox, he has been a guest on Soul Food and has appeared in films with Mekhi Phifer and Omar Epps and received two Young Artist Awards the Shaw Rocket Award and a Teen Choice Awards.
Notice update
On 13th February, our group and I did shots of the artist for our music video.We have managed to get half of the music video done. Our group and I will discuss the next meeting for doing shots in Central London.


Subscribe to:
Posts (Atom)